Looking for a light and fluffy low FODMAP dessert? Try this delicious low FODMAP lemon cake recipe! Made with fresh lemon zest and covered in buttercream frosting, this treat will put a bounce in your spring season.
- 1.5 tbsp lemon juice (room temperature)
- 1.5 cups lactose-free milk (1% fat, room temperature)
- 3.75 cups gluten-free all-purpose flour (plus more for pans)
- 3.25 tsp baking powder
- 1/4 tsp baking soda
- 2 tsp kosher salt
- 1.5 cups unsalted butter (room temperature)
- 2.5 cups sugar
- 2 tsp lemon zest (finely grated)
- 5 large eggs (room temperature)
- 1/4 cup lemon juice
- 1 cup butter (room temperature)
- 3 cups icing sugar
- 1 tsp vanilla extract
- pinch salt
- 2-3 tbsp whipping cream
-
Prepare your buttermilk alternative by measuring out 1.5 cups of lactose-free milk. Remove 1.5 tbsp of milk and add 1.5 tbsp of lemon juice (or vinegar, if you don't have enough lemon juice for the cake batter and the buttermilk). Put the buttermilk aside and let it rest for 5-10 minutes.
-
Preheat your oven to 325 degrees. Butter two 8" cake pans, then line each pan with parchment paper (cut off the excess paper, but leave yourself some "handles" to help get the cakes out). Then butter the parchment paper itself to keep the cake from sticking. Finally, dust each cake pan with a tiny bit of flour. Make sure to gently tap each pan over the sink to remove any excess flour.
-
Whisk together your flour, baking powder, baking soda, and salt in a medium-sized bowl. Set it aside.
-
In a large bowl, beat your butter, sugar, and lemon zest on medium speed until it gets fluffy. Then add one egg at a time, blending each egg in completely before you add the next one (you may need to scrape down the sides of the bowl a few times during this process). Then beat in your lemon juice.
-
Next, alternate your flour mixture and your buttermilk alternative, blending on low speed in between additions. The additions should be as follows: 1/3 flour, followed by 1/2 buttermilk alternative, followed by 1/3 flour, followed by the rest of the buttermilk alternative, then the rest of the flour for 5 additions total.
-
Once your batter is thoroughly combined, divide it evenly between both pans. Smooth out the tops with a spatula to make them as even as possible, then bake for about 1 hour and 10 minutes. You'll know the cakes are done when they're a nice golden brown and when the crust springs back if you poke it with your finger.
Once cooked, place both pans on a wire rack for 10 minutes, then pull the cakes out of their pans using the parchment paper "handles." Remove the parchment paper and let the cakes rest on the racks for at least two hours before icing.
-
Place butter in a large bowl and beat on medium until the butter is fluffy. Add your icing sugar and beat on low until the mixture looks like parmesan cheese. Then increase the speed to medium and beat until the mixture looks like icing. Add your vanilla, salt, and 2 tbsp of whipping cream (and food colouring if you're using that). Mix on medium speed until combined, then check the consistency. If it's too stiff, add another half tbsp of whipping cream. If it's too runny, add a little more icing sugar.
-
Trim your cake by cutting across the top of each layer to make them even. You may also need to trim a little off the sides to make sure they match.
Put some icing on the bottom of your plate so your cake doesn't wiggle when you're icing it. Place the bottom layer on the plate and ice the top. Then, place your top layer on the bottom layer and ice the top and sides of the cake with a very thin layer of icing. Place the cake in the fridge for 10 minutes to allow the icing to firm up. This is called "dirty icing" or creating a "crumb coat." It will keep stray crumbs from frolicking around in your decorative icing and wrecking all your hard work!
-
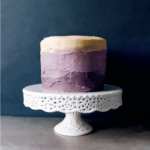
Once your crumb coat is ready, you can ice your cake however you fancy. I made an ombre cake using 3 graded layers of purple and a final "nude" buttercream layer. You can also use a piping bag and icing tips to make fun designs, flowers, cool effects, etc. Be creative!
The cake pictured used 4 layers. To recreate this photo, you will need to double the cake recipe and use two batches of icing.
This cake should be stored in an airtight container or under a cake dome at room temperature. Putting the cake in the fridge will congeal the butter in the cake and make it excessively dense.